
This classic dessert brings back memories of summer picnics and Sunday afternoons. You find these ingredients in almost every pantry, and the process takes very little effort. It remains a favorite because it feels nostalgic while providing a light, cool finish to any meal.
Ripe bananas offer a natural sweetness that balances the custard base. Those crisp cookies soak up the moisture, turning soft and cake-like as they sit. You end up with a dessert that balances smooth, creamy layers with fresh fruit. Grab a spoon and dig in!
Why You Will Love This Recipe
- Uses Common Ingredients: You likely have everything you need in your kitchen right now. Flour, sugar, milk, and eggs combine to make a classic custard from scratch.
- Perfect Texture Contrast: The magic happens when the crunchy cookies meet the creamy pudding. After a few hours in the fridge, the wafers soften just enough to melt in your mouth.
- Great for Crowds: This dish feeds a large group without requiring expensive or hard-to-find items. It travels well to potlucks and parties.
- Simple Setup: You do not need a fancy mixer or specialized equipment to build these layers. Just a whisk, a heavy-bottomed pan, and a bowl get the job done.
- Natural Fruit Sweetness: Sliced bananas provide fresh flavor that cuts through the sugar of the pudding. Using firm-ripe fruit ensures the pudding stays fresh without turning mushy too fast.
Ingredients
- Granulated Sugar (3/4 cup): This provides the main sweetness for your homemade custard base. It dissolves easily into the warm milk and egg mixture.
- All-Purpose Flour (1/3 cup): This acts as your thickener to keep the pudding from becoming too runny. Whisk it well with the sugar to prevent any clumps from forming.
- Large Eggs (2): These add richness and help the pudding set into a smooth consistency. Whisk them thoroughly before adding them to the hot liquid.
- Whole Milk (2 cups): Whole milk creates a better texture than skim versions for this specific dessert. It makes the final result velvety and smooth against the tongue.
- Vanilla Wafers (1 box): These cookies provide the signature flavor and structure for the layers. Do not settle for generic store brands if you want that classic buttery crunch.
- Ripe Bananas (4): Use bananas that have just a few brown spots on the peel for the best flavor. These are sweet enough to stand out but firm enough to hold their shape.
✅ Also Read: Easy Coconut Cream Pie with Meringue You Will Love
Steps to Make Vanilla Wafer Banana Pudding: Step-by-step Easy Guide
Whisk the Base Ingredients
Combine your sugar and flour in a medium saucepan before turning on the heat. Add the eggs and whisk them until you have a smooth, pale yellow paste. This technique prevents lumps that often plague beginners. Pour in the milk slowly while whisking to create a uniform liquid mixture.
Cook the Custard Carefully
Place your pan over medium heat and stir constantly with a wooden spoon or heat-resistant spatula. You want to reach a simmer where bubbles gently break the surface. Watch for the mixture to thicken enough to coat the back of your spoon. This takes about eight minutes of focused stirring.
Assemble the Layers
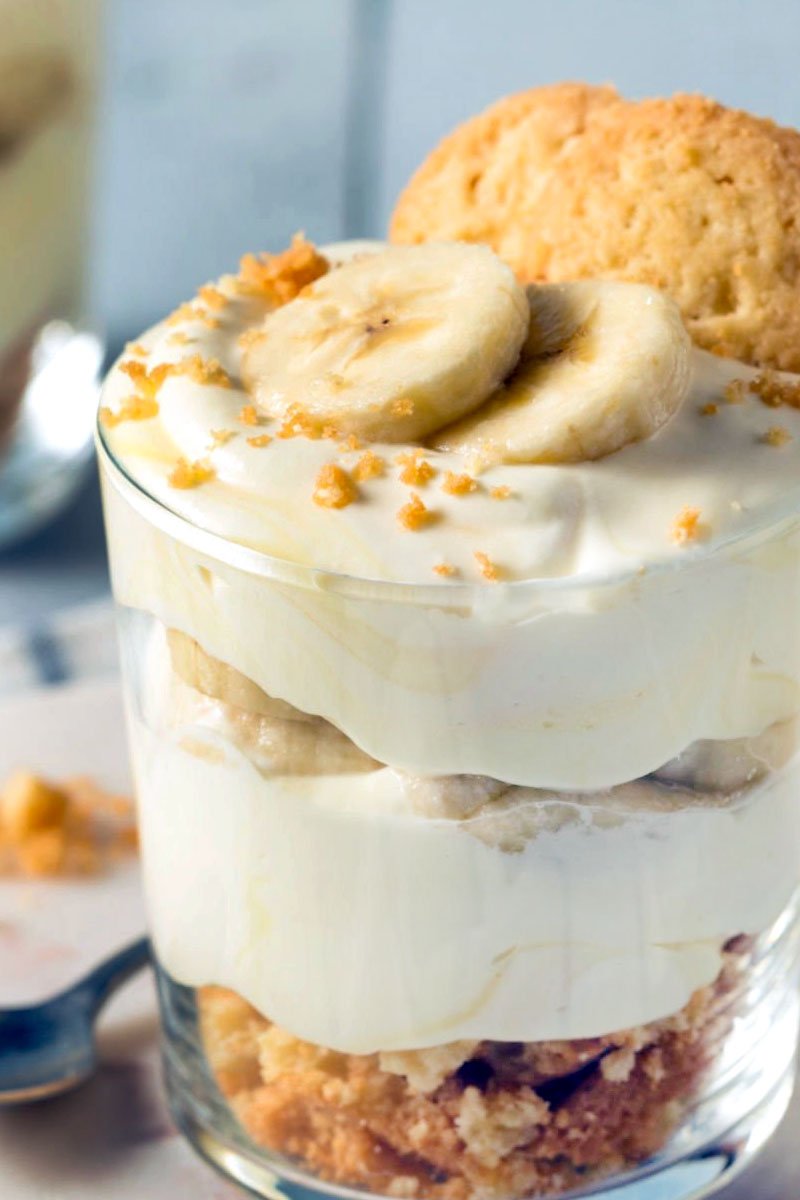
Grab a glass dish and start with a single layer of wafers on the bottom. Add a layer of sliced bananas over the cookies to ensure every bite has fruit. Pour a portion of your warm pudding over the top to cover the fruit completely. Repeat this process until you run out of ingredients.
Chill for the Best Results
Cover your dish with plastic wrap and place it in the refrigerator for at least four hours. This time allows the cookies to absorb the liquid from the pudding. You will notice the whole dish becomes easier to scoop once it cools down. Serve it cold for the best experience.
What to Serve with Vanilla Wafer Banana Pudding
Add Whipped Cream
A dollop of fresh, lightly sweetened whipped cream adds a nice contrast to the denser pudding. You can spread it across the entire top or add it to each individual bowl.
Pair with Black Coffee
The deep bitterness of a strong cup of coffee cuts through the sugar in this dessert. It makes the meal feel more balanced if you are serving it after a heavy dinner.
Serve with Fresh Berries
Scatter a handful of raspberries or blackberries on top of your serving. The tartness from the berries adds a bright pop of color and acidity to every bite.
Include Crunchy Toppings
Sprinkle some toasted coconut flakes or crushed nuts over the top right before serving. These additions provide a little extra texture that rounds out the soft pudding.
✅ See Also: Easy Homemade Betty Crocker Coconut Cream Pie
Storage and Reheating
Keep It in the Fridge
Cover your pudding tightly with plastic wrap to prevent a skin from forming on the surface. It stays fresh in the refrigerator for up to three days.
Use the Right Containers
Glass or ceramic dishes work better than metal pans for storing this dessert. These materials do not react with the fruit and keep the temperature steady.
Avoid the Freezer
Do not attempt to freeze this pudding as it ruins the texture of the bananas. The high water content causes the fruit to turn into mush once you thaw it.
Serve It Cold
This dish is best eaten chilled straight from the fridge. You do not need to reheat it, as the temperature contrast is part of what makes it enjoyable.
What Makes This Recipe Special
Classic Flavor Profile
This recipe relies on the simple combination of vanilla and banana. It skips heavy syrups or artificial flavors found in many modern desserts.
Texture Transformation
The way the wafers soften inside the pudding is unique to this dish. Most desserts stay crunchy or stay soft, but this one creates a middle ground.
Scratch-made Custard
Making your own pudding base allows you to control the thickness. You avoid the powdery taste that comes from using pre-packaged instant mixes.
Simple Aesthetic
The layers of cookies and fruit create a clean look in a glass dish. You do not need to be a professional baker to make this look appetizing.
✅ See Also: Easy Chicken Pot Pie with Bisquick We Make Often
Pro Tips for the Best Results
Monitor the Heat Closely
Keep your burner on medium-low to avoid burning the bottom of your custard. If you notice a dark smell, take the pan off the heat immediately. Scorched pudding will ruin the flavor of the entire batch.
Slice Bananas Last
Cut your fruit only when you are ready to assemble the layers. Exposed banana slices turn brown quickly when they sit in the open air. Adding them right before the pudding layer keeps them bright.
Choose Ripe Bananas
Select fruit that is yellow but still firm to the touch. If they are too soft, they will disintegrate and make the pudding look messy. You want distinct slices in every spoonful.
Stir to the Edges
Use your spatula to scrape the corners of your saucepan while the custard cooks. Pudding tends to thicken faster around the edges, and leaving it can cause hard bits. Constant movement keeps the consistency uniform throughout.
Variations and Substitutions
Use Vanilla Extract
Add a teaspoon of pure vanilla extract after you remove the custard from the heat. This step enhances the aroma without changing the texture of the pudding base.
Try Different Cookies
Replace the standard wafers with butter cookies or shortbread if you want a different flavor. Keep in mind that these might absorb liquid differently than the classic wafers.
Switch the Fruit
Swap half the bananas for sliced strawberries or peaches during the summer. These fruits hold up well and offer a different taste while keeping the structure intact.
Change the Milk
Use half-and-half if you want a thicker, more decadent result. This substitution makes the dessert feel much heavier, so adjust your portion sizes accordingly.
Frequently Asked Questions
Can I Make This Ahead of Time?
You should make this at least four hours before you plan to serve it. It tastes even better the next day because the cookies have more time to soften. Keep it chilled in the fridge until the very last minute.
Is This Recipe Freezer-friendly?
This dessert does not handle the freezer well because of the high moisture in the pudding and fruit. The bananas will turn icy and turn into a mushy liquid once thawed. Plan to eat the whole batch within a few days.
Are There Any Dairy-free Options?
You can substitute the whole milk with a thick plant-based milk like oat or almond milk. Make sure to use a version that is unsweetened so you do not change the balance of the dessert. You might need to adjust your flour slightly to get the right thickness.
Do I Need a Special Pan for This?
A standard medium saucepan works fine for making the custard base on the stove. For the assembly, any deep glass dish will hold the layers nicely. You do not need expensive baking pans for this process.
Does This Work with Frozen Bananas?
Frozen fruit is not suitable for this specific layering method. The texture changes too much, and the excess water will make the pudding runny. Stick to fresh, firm bananas for the best results.
Can I Reduce the Sugar?
You can lower the sugar by a small amount without hurting the setting of the custard. If you remove too much, the pudding will taste flat and lose its appeal. Experiment with reducing it by a tablespoon at a time.
Does This Need a Garnish?
Garnishing is optional but adds a nice professional look to your dessert. A few extra wafer crumbs or a slice of fresh banana on top creates a clean finish. Keep it simple so you do not overwhelm the classic flavors.
Final Thoughts
This pudding is the perfect way to finish a meal without spending hours in the kitchen. The combination of creamy custard and soft cookies never goes out of style. Grab your favorite glass dish and start layering today. You will appreciate how easy it is to bring this classic home!
Simple Vanilla Wafer Banana Pudding
Ingredients
- 3/4 cup Granulated Sugar
- 1/3 cup All-Purpose Flour
- 2 Large Eggs
- 2 cups Whole Milk
- 1 box Vanilla Wafers
- 4 Ripe Bananas
Tools You Need
- Medium saucepan
- Whisk
- Wooden spoon
- Glass serving dish
- Sharp knife
Steps
- Whisk the sugar and flour in a medium saucepan.
- Add the eggs and stir until smooth.
- Pour in the milk slowly while whisking the mixture.
- Cook over medium heat while stirring constantly until thickened.
- Layer wafers and sliced bananas in a glass dish.
- Cover the layers with a portion of the warm pudding.
- Repeat the layers until all ingredients are used.
- Chill the dish in the refrigerator for at least four hours.