
This savory meal provides the comfort of a slow-baked dinner without the long wait. After a busy day, you want something warm that fills the house with a familiar, home-cooked smell. When you have hungry people at the table, this dish delivers exactly what everyone needs to feel satisfied and ready to relax.
The biscuit mix creates a tender, golden crust that soaks up the savory gravy while the chicken stays juicy underneath. You get a perfect balance of soft, buttery dough and hearty vegetables in every single forkful. One bite of this bubbly, crusty pie makes your evening feel grounded and calm.
- Fast Preparation Time: You avoid the hassle of rolling out traditional pie dough or waiting hours for a crust to set. Everything comes together in a few minutes, so you spend more time eating and less time staring at the clock.
- Reliable Biscuit Topping: Using a pre-made mix takes the guesswork out of baking. You get a fluffy, golden top every time without worrying about the dough tearing or staying soggy in the middle.
- Hearty Filling: This meal packs in plenty of protein and vegetables to keep you full for hours. It feels like a complete dinner without needing to cook extra sides, making it a dream for busy weeknights.
- Simple Pantry Ingredients: You likely have most of these items waiting in your kitchen right now. It uses basic staples like canned soup and frozen veggies, so you can pull this together on short notice without a trip to the store.
- Kid-Friendly Flavors: The mild, creamy sauce and soft biscuits appeal to everyone, even the pickiest eaters. You can count on clean plates and very few complaints when you set this in the middle of the table.
- Cooked Chicken (2 cups): Use shredded rotisserie chicken or leftovers from Sunday dinner. It adds substance and protein, which holds the pie together and provides a savory base for the gravy.
- Frozen Mixed Vegetables (2 cups): These include carrots, peas, and corn for color and texture. You do not need to thaw them first, as they release just enough moisture into the pie while it bakes.
- Condensed Cream of Chicken Soup (1 can): This acts as the glue for your filling and provides a thick, salty foundation. It saves you from making a roux from scratch while guaranteeing a smooth, consistent texture.
- Milk (1 cup): Stir this into the soup to thin the gravy to the right consistency. It prevents the filling from becoming too dry in the oven and helps the flavor meld with the chicken.
- Bisquick Biscuit Mix (2 cups): This is the magic ingredient for your crust. It rises into a light, airy top layer that contrasts with the dense filling, giving you that classic pot pie experience with half the effort.
- Milk for Crust (1 cup): You mix this directly with the biscuit mix to form a soft, pourable batter. Pour it evenly over the top so you get a uniform crust that browns beautifully in the hot oven.
Preparation of the Filling
Mix the Base Ingredients
Start by grabbing a large mixing bowl for your filling components. Combine your shredded chicken, frozen vegetables, and the can of soup in the bowl. Stir everything until the vegetables and meat look well-distributed throughout the thick sauce.
Adjust the Gravy Consistency
Pour the first cup of milk into your mixture slowly while stirring. You want the filling to look like a thick stew rather than a solid block. The vegetables should look like they are swimming in a light, creamy liquid.
Assembly of the Pie
Transfer to Baking Dish
Grease a standard nine-by-nine-inch baking pan with a little butter or oil. Dump the chicken and vegetable mixture into the pan and spread it out toward the corners. Use a spatula to press it down gently until the surface looks level and even.
Prepare the Biscuit Batter
Whisk the biscuit mix and the second cup of milk in a separate bowl until you see no dry flour clumps. The batter should look thick and slightly lumpy, similar to pancake batter. Pour this mixture carefully over the chicken base, starting from the center and working your way out.
Baking for Golden Results
Set the Oven Heat
Preheat your oven to 400 degrees to ensure a quick, even bake. You want the heat to hit the bottom of the pan right away so the filling bubbles up around the edges. If the oven is too cool, the crust might turn out dense instead of fluffy.
Watch for Browning
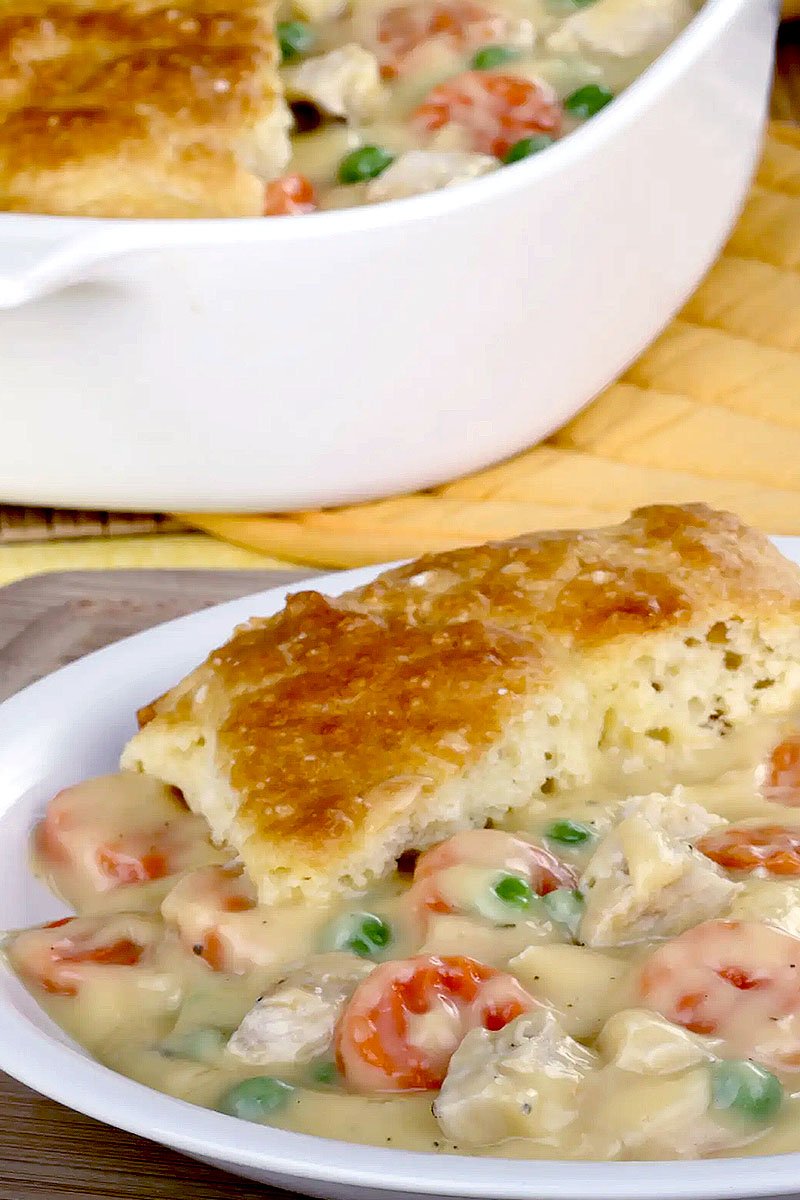
Place the pan on the middle rack and set a timer for thirty minutes. You will know it is ready when the crust turns a deep, golden brown color and the edges look bubbly. The kitchen should smell like warm butter and roasted chicken as the crust sets.
Serving the Final Dish
Cool Before Cutting
Let the pan sit on your counter for five to ten minutes after pulling it out of the oven. This brief rest lets the gravy thicken up so it does not run everywhere when you scoop it. You get cleaner portions and a better texture if you wait just a little while.
Scoop Onto Plates
Use a large metal spoon to dish out generous squares of the pie. Ensure you get plenty of the golden crust with every scoop of the creamy chicken mixture. Serve it while the steam is still rising for the best experience.
What to Serve with Easy Chicken Pot Pie with Bisquick
Crisp Garden Salad
Balance the heaviness of the creamy pie with a bowl of cold, crunchy greens. A simple vinaigrette dressing provides a sharp, acidic contrast to the warm gravy. Focus on using fresh lettuce, cucumbers, and radishes for that satisfying snap.
Roasted Seasonal Vegetables
Add a side of roasted broccoli or asparagus to bring more color to your meal. You can toss them in olive oil and salt while the pie bakes. The char from the oven adds a nice depth of flavor that complements the soft filling.
Crusty Garlic Bread
If you love bread, a slice of toasted sourdough works well for mopping up extra gravy. Keep the butter light so you do not overwhelm the meal. The crunch of the toast offers a nice change from the soft biscuit topping.
Light Herb Garnish
Sprinkle fresh parsley or chives over the top of the pie just before serving. This small touch adds a bright, herbal pop that makes the dish look polished. It lifts the flavor profile without requiring much extra work.
Storage and Reheating
Keep in Fridge
Store any leftover portions in an airtight container for up to three days. Glass containers work better than plastic because they heat up evenly in the oven. Keep the lid tight to prevent the crust from absorbing moisture from the fridge.
Heat in Oven
Avoid the microwave if you want to keep the crust from turning soggy. Place your slice in a small oven-safe dish and bake it at 350 degrees until the middle is hot. This method restores the texture of the biscuit topping better than any other way.
Avoid Freezing
Freezing usually ruins the texture of the biscuit crust. The dough tends to lose its fluffiness and becomes chewy once it thaws out. Plan to eat the leftovers within a few days instead of trying to save them for long-term storage.
Check for Texture
The crust might get a little soft if you store it for too long. If you find the top has lost its crunch, toast it under the broiler for one minute. Keep a close watch so it does not burn while it regains its crispness.
What Makes This Recipe Special
The Shortcut Crust
Most recipes require you to handle dough, which is often frustrating and messy. Using a biscuit mix gives you the same comfort without the technical difficulty. It is a smart way to get a homemade result in under an hour.
Creamy Filling Ratio
The balance between the chicken, vegetables, and soup creates a specific density. You do not need to add extra salt or herbs because the soup provides a solid flavor foundation. It is a consistent meal that tastes exactly how you expect every time.
One Pan Cleanup
You only need two bowls and one baking pan to get this done. This makes the cleanup process very fast, which is essential for a busy weeknight. Spending less time at the kitchen sink is a perk that everyone appreciates.
Texture Contrast
The contrast between the crunchy, golden biscuit top and the silky, warm filling is the best part. Most casseroles are uniform in texture, but this recipe gives you two distinct layers. It keeps every bite interesting and satisfying until the very last piece.
Pro Tips for the Best Results
Avoid Overmixing
Mix the biscuit batter only until the dry spots disappear. If you beat the mixture too much, the crust becomes tough and dense instead of light and airy. Stop stirring the second the flour incorporates into the milk.
Evenly Spread Batter
Pour the batter slowly to ensure it covers the chicken base completely. If you leave large gaps, the chicken will dry out, and you will miss out on the crust in those spots. Use the back of a spoon to nudge the batter toward the edges of the pan.
Check the Bottom
Make sure your chicken and vegetables are spread in an even layer. If the filling is piled high in the center, the middle takes too long to heat through while the edges burn. Take an extra minute to level everything out before pouring the batter.
Add Fresh Herbs
Stir in a teaspoon of dried thyme or rosemary to the filling mixture. While the soup provides a base flavor, fresh or dried herbs make the chicken taste more robust. It is a simple step that significantly raises the quality of the dish.
Variations and Substitutions
Swap the Meat
Use cooked turkey instead of chicken if you have leftovers from a holiday meal. It works exactly the same way and brings a slightly deeper flavor to the pie. The texture remains identical, so no other adjustments are needed.
Try Different Veggies
Feel free to add sliced mushrooms or diced potatoes if you want extra bulk. Just ensure you chop the potatoes into small cubes so they cook through in the time it takes for the crust to brown. This is a great way to clear out the vegetable crisper.
Use Plant Milk
Substitute the dairy milk with an unsweetened almond or soy version. It works well for the batter and the filling, though it might change the richness slightly. Keep the measurements the same for a consistent result.
Add Some Spice
Mix a pinch of red pepper flakes into the gravy for a slight kick. It cuts through the creamy sauce and gives the meal a more exciting flavor. Add it sparingly at first until you know how much heat you prefer.
Frequently Asked Questions
Can I Make This Ahead of Time?
You can mix the filling and the batter separately but keep them in the fridge until you are ready to bake. If you assemble it too early, the biscuit mix will soak up the milk and become gummy. Assemble everything right before you put the pan into the oven for the best texture.
Is This Recipe Freezer-friendly?
Freezing this dish is not recommended because the biscuit topping loses its fluffy quality. The crust tends to turn dense and chewy after being in the freezer. It is much better to make the meal fresh or store it in the fridge for a few days.
Are There Any Dairy-free Options?
You can use a dairy-free soup base and almond milk to keep the recipe free of milk products. Make sure to check the biscuit mix label, as some brands contain dry milk powder. With those simple swaps, you can accommodate dairy sensitivities without losing the comfort of the dish.
Do I Need a Special Pan for This?
A standard glass or metal baking pan works perfectly fine for this recipe. You do not need a deep pie dish, as a rectangular or square pan offers more surface area for the crust to brown. Just make sure the pan has high enough sides so the gravy does not bubble over.
Does This Work with Frozen Chicken?
You should thaw your chicken completely before mixing it into the filling. Adding frozen meat releases too much water, which turns the gravy thin and prevents the biscuit crust from setting correctly. Always use cooked, thawed chicken for the best consistency and safety.
Can I Add Cheese to the Crust?
Sprinkling a little shredded cheddar over the top of the biscuit batter adds a nice savory layer. Do this during the last five minutes of baking to prevent the cheese from burning. It gives the crust a beautiful golden color and a slightly salty finish.
Does the Crust Need to Be Thick?
The thickness of the crust depends on how much batter you pour over the top. A thinner layer creates a crispier top, while a thicker layer gives you a biscuit-like texture. Follow the recommended amount of milk and mix to ensure you get that classic balance.
The beauty of this meal lies in its simplicity and the comfort it brings to your kitchen. You get a hearty, satisfying dinner without needing hours of preparation. Grab these ingredients and put this in the oven tonight to see how quickly it becomes a new family favorite.

Easy Chicken Pot Pie with Bisquick
Ingredients
- 2 cups cooked chicken, shredded
- 2 cups frozen mixed vegetables
- 1 can condensed cream of chicken soup
- 1 cup milk for filling
- 2 cups Bisquick biscuit mix
- 1 cup milk for crust
Tools You Need
Steps
- Preheat your oven to 400 degrees.
- Combine the chicken, vegetables, and soup in a large bowl.
- Stir in one cup of milk until the mixture looks smooth.
- Spread the chicken mixture evenly into your greased baking pan.
- Whisk the biscuit mix and the remaining milk in a separate bowl.
- Pour the batter evenly over the chicken base.
- Bake for thirty minutes until the top turns golden brown.
- Let the pie rest for ten minutes before scooping.