
There are few things more frustrating in the kitchen than wrestling with a stubbornly unpeeling hard-boiled egg. You've carefully boiled them, cooled them, and then… disaster. White bits cling to the shell, and your beautiful egg looks like it lost a fight.
It doesn’t have to be this way. This method focuses on one simple goal: making your hard-boiled eggs release from their shells cleanly and effortlessly. No special equipment needed, just a few smart steps.
With this straightforward approach, you'll be cracking perfect eggs with ease. Get ready to enjoy hassle-free hard-boiled eggs for all your favorite dishes.
Why You Will Love This Recipe
- Effortless Peeling: Say goodbye to frustrating bits of shell sticking to your eggs. This technique ensures a smooth, clean peel every time, saving you time and mess. You can finally make deviled eggs without the drama.
- Perfectly Cooked Yolks: You get that ideal, creamy, bright yellow yolk without any grey or green ring around it. The consistent cooking method ensures your eggs are never chalky or underdone.
- Simple Stovetop Method: No fancy gadgets or complicated timers required. This is a straightforward process using basic kitchen tools you already have. It's the kind of reliable method you can use week after week.
- Great for Meal Prep: Make a batch at the beginning of the week and have them ready for salads, snacks, or quick lunches. Their easy-peel nature makes them ideal for quick assembly when you're short on time.
- Versatile Ingredient: These perfectly cooked eggs are a blank canvas for so many meals. Enjoy them plain, in egg salad sandwiches, on avocado toast, or sliced into a ramen bowl.
Ingredients
- 1 dozen large eggs
- Water
- Ice
✅ Also Read: Fluffy Banana Pancakes with Cottage Cheese
How to Make Easy Peel Hard Boiled Eggs — Step by Step
Start with Cold Water
Begin by placing your large eggs directly into a saucepan. You want them in a single layer. Don’t overcrowd the pan, as this can lead to uneven cooking. If your eggs are straight from the fridge, that's perfect. This recipe works best with cold eggs.
Cover Eggs with Water
Now, add enough cold water to the saucepan to cover the eggs by about one inch. Using cold water from the start is crucial. It helps the eggs heat up gradually, which contributes significantly to easier peeling later on. This slow and steady warming prevents the eggs from cracking.
Bring to a Rolling Boil
Place the saucepan over high heat on your stovetop. Let the water come to a full, rolling boil. Watch for those big bubbles actively churning across the surface. This is the point where the cooking process really begins, so keep an eye on it.
Turn Off Heat and Cover
As soon as the water reaches a rolling boil, immediately turn off the heat. Take the saucepan completely off the burner. Cover the pot tightly with a lid. The residual heat trapped inside the pot is what will gently cook the eggs the rest of the way.
Let Them Steep
Now, let the eggs sit, undisturbed, in the hot water. For large eggs, you’ll want to let them steep for 10 to 12 minutes. This steeping time allows the heat to penetrate and cook the eggs thoroughly without further vigorous boiling, which can toughen them.
Prepare an Ice Bath
While the eggs are steeping, prepare an ice bath. Fill a large bowl with cold water and add a generous amount of ice cubes. You want this bath to be really cold, almost shockingly so. This rapid cooling is key to stopping the cooking process and helping the shells contract.
Shock the Eggs
Once the 10 to 12 minutes are up, carefully remove the eggs from the hot water using a slotted spoon. Immediately transfer them into your prepared ice bath. Let them chill in the ice water for at least 10 to 15 minutes. This drastic temperature change makes the egg white pull away from the shell.
Peel Your Perfect Eggs
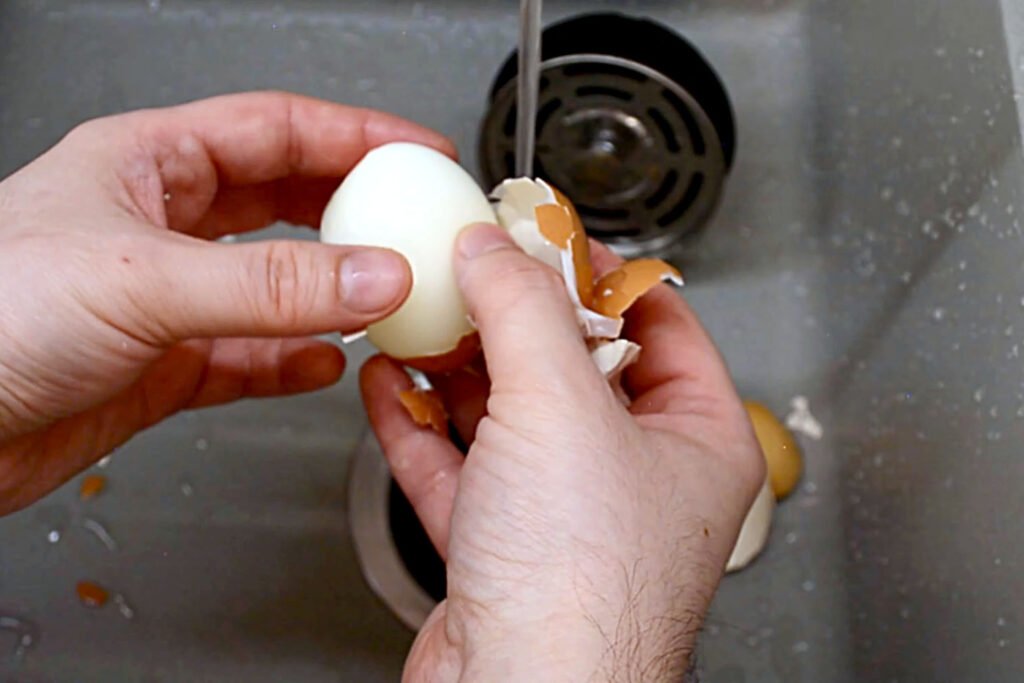
Once the eggs are thoroughly chilled, it’s time to peel. Gently tap the widest end of an egg on a hard surface, then roll it between your hands or on the counter to crackle the shell all over. Start peeling from the wider end, where the air pocket is. The shell should slip off easily, often in large pieces. If a small bit sticks, a quick rinse under cool water usually helps.
What to Serve with Easy Peel Hard Boiled Eggs
Elevate Your Salads
These perfectly peeled hard-boiled eggs are a stellar addition to any salad. Imagine a Cobb salad made even more satisfying with a whole or quartered egg. They add protein and richness, making your greens a more complete meal. A simple spinach salad gets a protein boost with just a few sliced eggs.
The Foundation for Egg Salad
For many, hard-boiled eggs are synonymous with egg salad sandwiches or wraps. The easy-peel quality means you can make a big batch without the usual fuss. Mash them up with mayonnaise, a touch of mustard, celery, and your favorite seasonings for a classic lunch.
A Protein-packed Snack
When hunger strikes between meals, a plain hard-boiled egg is a fantastic, portable snack. Sprinkle it with a little salt and pepper, or your favorite everything bagel seasoning. It's satisfying and keeps you full until your next meal without any processed ingredients.
Add to Ramen or Noodle Soups
A jammy soft-boiled or firm hard-boiled egg is a classic topping for Japanese ramen. A perfectly cooked hard-boiled egg, often halved, adds a creamy, savory element that complements brothy noodle soups beautifully. It's a simple way to add depth and substance to your soup.
Storage and Reheating
Keep Unpeeled in the Fridge
Always store your hard-boiled eggs in their shells in the refrigerator. Keeping them unpeeled acts as a natural barrier, protecting the egg from absorbing odors from other foods and helping them stay fresh longer. They will last for about a week when stored this way.
Peel Just Before Eating
For the best texture and freshness, peel your hard-boiled eggs right before you plan to eat or use them. While they are safe to peel ahead of time, the exposed egg white can dry out more quickly in the refrigerator, affecting the taste and texture.
Avoid Freezing Hard-boiled Eggs
Hard-boiled eggs do not freeze well. When frozen, the whites become tough and watery. The yolk can also develop a rubbery texture. It's best to enjoy your hard-boiled eggs fresh or within their refrigerated shelf life.
Room Temperature Eggs
If you’ve peeled your eggs and want to serve them shortly after, it’s okay to leave them at room temperature for a couple of hours. However, for longer storage or if your kitchen is warm, always refrigerate them. Never leave peeled hard-boiled eggs out for more than two hours.
What Makes This Recipe Special
The “Shock” Method
The real magic behind easy-peeling eggs lies in the rapid temperature change. Plunging the hot eggs into an ice bath causes the egg white to contract slightly, pulling away from the shell membrane. This separation is the secret to those clean peels.
Gradual Heating Prevents Cracking
Starting with cold water and gradually bringing the eggs to a boil helps prevent the shells from cracking. A sudden temperature shock to a cold egg can cause the shell to expand too quickly and fracture. This gentle heating method keeps them intact.
No Greying Yolks
The combination of steeping in hot water and then immediately chilling in an ice bath precisely cooks the egg. It stops the cooking right at the perfect moment, preventing the overcooked yolk that develops that unappealing grey-green outer ring.
Simplicity of the Technique
What's special is how effective this simple, low-tech method is. You don't need special equipment or advanced cooking skills. It relies on basic principles of heat transfer and temperature shock, making perfect eggs accessible to everyone.
Pro Tips for the Best Results
Use Older Eggs
Believe it or not, slightly older eggs peel more easily than very fresh ones. As eggs age, the air cell inside gets larger, and the pH of the egg white changes, making it less likely to stick to the shell. If you have eggs that are a week or two old, they are your best candidates for easy peeling.
Don’t Overcook the Eggs
The steeping time is crucial. For large eggs, 10–12 minutes is usually perfect for a firm yolk. If you prefer a softer, jammy yolk, reduce the steeping time to 6–7 minutes. Overcooking is a common mistake that can lead to dry, chalky yolks and make peeling harder.
Crack on a Hard Surface
When you’re ready to peel, tap the egg firmly on a countertop or the side of a ceramic bowl. This creates enough cracks to start the peeling process effectively. Rolling the egg gently between your hands afterward helps to loosen the shell all over, making it easier to remove in large pieces.
Start Peeling From the Wide End
Locate the wider end of the egg. There's a small air pocket here, and the membrane underneath is usually looser. Gently insert your thumb or a fingernail under the shell at this wide end. You should find that the shell and membrane lift away from the egg white much more readily.
Variations and Substitutions
Adjust for Egg Size
The cooking times provided are for large eggs. If you are using extra-large eggs, add an extra minute or two to the steeping time. For medium or small eggs, reduce the steeping time by a minute or so to prevent overcooking. Always check for doneness and adjust accordingly.
Different Boiling Methods
While this method is fantastic, some cooks swear by the boiling water start. Bring the water to a boil first, then gently lower the eggs into the already boiling water. Cook for 10–12 minutes, then immediately plunge into an ice bath. This can sometimes yield even easier peels.
Flavor Infusion
For a subtle flavor twist, you can add a teaspoon of salt or a splash of vinegar to the cold water before heating. These additions are thought to help denature the egg proteins slightly, making the whites less likely to stick to the shell. It's a small change that can make a difference.
Baking Soda Trick
Some people find adding a teaspoon of baking soda to the cold water before heating helps with peeling. Baking soda raises the pH of the water, which can make the egg whites more alkaline and easier to separate from the shell. It's an easy pantry addition to try if you're struggling.
Frequently Asked Questions
Can I Use Fresh Eggs?
While you can use very fresh eggs, they tend to be more difficult to peel. Older eggs, typically a week or more old, have a slightly altered pH balance and a larger air cell, which makes the egg white separate more easily from the shell.
Is This Method Good for Soft-boiled Eggs?
Yes, this method works wonderfully for soft-boiled eggs too. Simply reduce the steeping time to 6–7 minutes after turning off the heat. The rapid cooling in the ice bath will stop the cooking process, leaving you with a perfectly jammy yolk.
Are There Any Special Pans Needed?
No, a standard saucepan that is large enough to hold your eggs in a single layer is all you need. Ensure it has a tight-fitting lid. Any pot you’d normally use for boiling water will work perfectly for this recipe.
Do I Need to Peel Them Right Away?
You can let them sit in the ice bath for up to 15 minutes. After that, it's best to store them unpeeled in the refrigerator. Peeling them while still cold is ideal, but don’t let them sit at room temperature for too long after peeling.
Can I Cook Multiple Dozen at Once?
It’s best to cook eggs in a single layer in the saucepan. Overcrowding can lead to uneven cooking and peeling. If you need a large quantity, you might need to use multiple saucepans or cook them in batches.
Does the Water Level Matter?
Yes, ensure the water covers the eggs by at least one inch. This ensures that all the eggs are submerged and cook evenly. If the water level drops too much during boiling, you may need to add a bit more hot water.
Will This Method Work for Quail Eggs?
This method is optimized for large chicken eggs. Quail eggs are much smaller and cook much faster. For quail eggs, you would typically boil them for only 2–3 minutes and then immediately chill them in an ice bath.
Final Thoughts
Mastering easy peel hard boiled eggs is a simple win that makes cooking easier. Forget the frustration of stuck shells. Follow these steps for perfectly cooked eggs, ready for any dish you have in mind. Happy cooking!