
Street food memories often start with a cloud of sweet steam on a busy corner, and making that same snack at home brings all that joy right back to your kitchen counter. You get that exact street cart magic without booking a flight across the world.
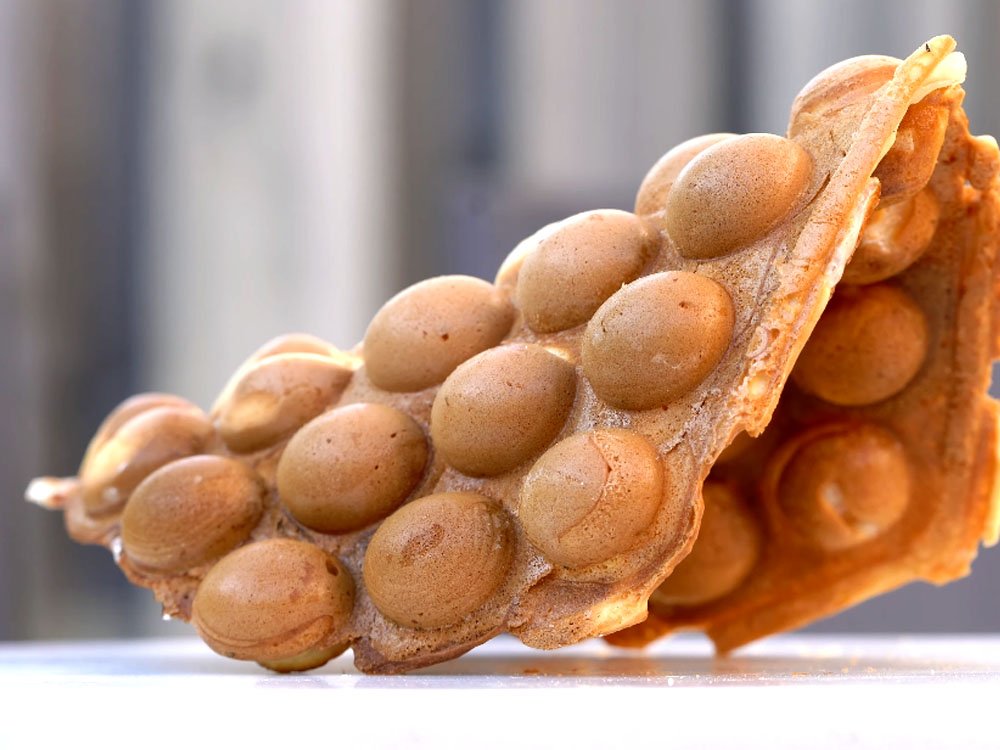
Crispy outer shells give way to hollow, chewy spheres, so every single bite offers a fun contrast in texture. Tapioca flour creates that signature bounce, while eggs build a rich golden batter that smells like sweet cream as it bakes. Stick around, and you will get the exact trick for getting those crisp edges every single time.
Why You Will Love This Recipe
- Fun Texture: Little puff balls pop apart in your mouth, giving you a mix of crisp edges and chewy centers that normal waffles just cannot match.
- Street Food Nostalgia: Familiar smells fill your whole house, taking you straight back to bustling night markets with every warm batch you pull from the iron.
- Fast Cooking Time: Each batch takes less than three minutes to bake, keeping hungry kids happy without making you wait forever by the hot stove.
- Customizable Fillings: Chocolate chips or fruit pieces drop right into the batter pockets, letting you change up the flavors with whatever is hiding in your pantry.
- Pantry Friendly: Basic baking staples make up the batter, so you do not need to hunt down weird ingredients just to satisfy a weekend craving.
Ingredients
- All-Purpose Flour (1 cup): Builds the main structure of your batter, giving the waffles enough body to hold their shape without turning dense or heavy.
- Tapioca Starch (1/4 cup): Creates that famous chewy bounce inside each bubble, and you cannot swap this out if you want the real street style texture.
- Baking Powder (1 teaspoon): Helps the batter puff up fast when it hits the hot iron, creating light pockets instead of flat pancakes.
- Granulated Sugar (1/2 cup): Sweetens the batter just enough to brown nicely, turning the edges golden brown without burning too fast on the hot plates.
- Large Eggs (2): Adds rich color and moisture to the mix, binding all the dry ingredients together while keeping the inside soft.
- Evaporated Milk (1/2 cup): Brings a creamy, milky depth to the flavor, working way better than regular milk because it has less water weight.
- Water (1/4 cup): Thins out the heavy milk and flour mixture, making a smooth batter that flows easily into every single corner of your waffle iron.
- Vegetable Oil (2 tablespoons): Stops the batter from sticking to your hot metal plates, while also giving the outside crust that wonderful fried crunch.
- Vanilla Extract (1 teaspoon): Rounds out the sweet eggy flavor with a warm aroma, making the whole kitchen smell amazing while the iron sizzles away.
Steps to Make Hong Kong Bubble Waffle Recipe (Quick and Easy Guide)
Mixing the Smooth Batter
Whisk your flour, tapioca starch, baking powder, and sugar together in a large bowl until no little lumps remain. Pour in the eggs, evaporated milk, water, oil, and vanilla, then stir until the batter looks completely smooth and runny like heavy cream. Strain the liquid through a fine-mesh sieve to catch any stubborn flour pockets, because smooth batter makes the best bubbles. Let that bowl rest on your counter for thirty minutes so the starch absorbs the liquid fully.
Heating the Special Iron
Place your bubble waffle maker over medium heat on the stove, or plug in your electric model until it reaches full operating temperature. Brush both sides of the hot metal plates generously with vegetable oil, making sure to coat every single little round pocket. Hot metal is the only way to get that crispy outer shell, so do not rush this heating step. Listen for a sharp sizzle the second a drop of water touches the metal surface.
Pouring and Flipping Fast
Ladle about three-quarters of a cup of batter right into the center of the bottom mold, starting in the middle and letting it spread. Close the lid firmly, lock the handles together, and immediately flip the entire iron upside down so the batter fills the top half. Leave it alone for about one minute, letting the steam push the batter into every round bubble mold. You will smell a sweet, toasted aroma right as the edges start turning a lovely golden brown color.
Unmolding and Cooling Down
Flip the iron back to its original side, unlock the lid carefully, and check the color of your waffle to make sure it looks evenly toasted. Slide a wooden toothpick or a pair of chopsticks under the edge, and lift the warm waffle out of the metal molds in one piece. Transfer it immediately to a wire cooling rack, because trapping steam on a flat plate makes the crispy edges turn soggy fast. Roll the warm waffle into a cone shape right away if you plan on stuffing it with ice cream later.
What to Serve with Hong Kong Bubble Waffle Recipe
Sweet Drizzles
Chocolate syrup or condensed milk poured over the warm surface sinks right into the hollow bubbles, adding rich pockets of extra sweetness. Warm caramel sauce also works wonderfully, catching in the nooks and crannies to make every bite taste like a bakery treat.
Fresh Fruit
Sliced strawberries and ripe banana rounds add a bright, juicy contrast to the rich, eggy waffle dough. Berries cut through the sweet batter nicely, keeping the snack from feeling too heavy when you eat a whole cone by yourself.
Ice Cream Scoops
Vanilla bean ice cream melts slowly inside the warm waffle cone, creating a messy, delicious dessert that kids go crazy for. A single cold scoop balances out the piping hot pastry, making it the ultimate summer afternoon treat.
Fun Toppings
Rainbow sprinkles or crushed peanuts add a fun crunch to the sticky surface, making each bite feel like a party. Chocolate chips sprinkled on top right after baking will get all melty against the hot dough.
Storage and Reheating
Room Temperature Rest
Freshly baked bubble waffles taste best immediately, but you can keep them on a wire rack for a couple of hours if people are grazing. Do not stack them on top of each other, or the steam will soften those hard-earned crispy edges.
Reheating in the Oven
Pop leftover waffles into a warm oven at three hundred degrees for about five minutes to bring back their original crunch. Microwaving them is a bad idea, because it turns the crispy crust into a sad, chewy sponge.
Freezing for Later
Let plain waffles cool down completely before sliding them into a large freezer bag with parchment paper between each piece. They will stay fresh in the freezer for up to one month, ready for a quick breakfast emergency.
What Makes This Recipe Special
Tapioca Starch Magic
Adding tapioca starch to the flour mix changes everything about the final chew, giving you that bouncy texture you only find at street carts. Regular waffle flour just cannot mimic that stretchy, light center that makes these treats so addictive.
Special Spherical Mold
Hollow bubble shapes trap heat differently than flat grids, creating thin, crispy walls around a tender pocket of air. You get way more crunchy surface area per bite, which changes the whole eating experience completely.
High Heat Technique
Cooking these fast over high heat creates a contrast between the blistered outer crust and the soft inner dough. Low heat just dries the batter out completely, ruining that classic street food texture you want.
Pro Tips for the Best Results
Resting the Batter
Never skip the thirty-minute rest time for your batter, because the starches need that window to hydrate properly. Rushing this step leads to rubbery bubbles that break apart instead of staying nice and chewy.
Filling the Molds Right
Pour batter right into the center of the bottom plate, letting it spread outward naturally as you close the iron. Overfilling the pan makes a messy overflow that burns on the outside of your heating element.
Flipping the Iron Quickly
Flip the locked iron over ten seconds after closing it to make sure the batter coats both sides evenly. Hesitating during this flip leaves you with one thick side and one empty, burnt side.
Variations and Substitutions
Matcha Green Tea Twist
Instead of vanilla extract, mix one tablespoon of matcha powder into your dry ingredients for an earthy flavor and a bright green color. Your waffles will taste slightly herbal, pairing wonderfully with sweet red bean paste or vanilla ice cream.
Chocolate Batter Swap
Take out two tablespoons of flour and replace them with unsweetened cocoa powder to make a rich chocolate version of the snack. Drop white chocolate chips into the batter pockets right before closing the lid for a double chocolate treat.
Dairy Free Alternative
Instead of evaporated milk, use canned full-fat coconut milk to keep the batter creamy and rich without using any dairy products. The coconut flavor adds a subtle tropical note that goes great with fresh mango slices.
Frequently Asked Questions
Can You Make the Batter Ahead of Time?
You can mix the batter the night before and keep it in your fridge until morning. Just stir it well before pouring, because the heavy starches tend to settle at the bottom overnight.
Is a Special Waffle Maker Required?
You really need a bubble waffle iron with round mold pockets to get the right shape and texture. A normal square waffle maker will taste fine, but it will not give you those hollow spheres.
Are These Waffles Supposed to Be Crispy?
Crispy edges are the main goal here, contrasting with the soft, chewy centers inside each individual bubble sphere. Pulling them off the heat at the right moment keeps them from turning into hard crackers.
Do You Grease the Iron Every Time?
Brushing oil onto both hot plates before every single batch keeps the delicate batter from sticking to the metal. Skipping this step means your bubbles will rip apart when you try to open the lid.
Can You Freeze Baked Bubble Waffles?
Leftover plain waffles freeze surprisingly well if you wrap them tightly in plastic wrap and store them in a bag. Reheat them straight from frozen in a toaster oven to bring back their original crunch.
Does the Batter Need to Be Strained?
Straining the liquid removes any tiny flour clumps that refuse to mix, ensuring your batter pours smoothly into every tight mold corner. Taking that extra minute prevents weird pockets of dry flour in your finished snack.
Can Kids Help Make These Waffles?
Older kids love pouring the batter and watching the iron flip, but the hot metal requires adult supervision at all times. Let them handle the toppings instead to keep little fingers safe from burns.
Final Thoughts
Street food memories taste even better when you recreate them right in your own kitchen for your family. Grab your waffle iron, mix up a quick batch, and enjoy those crispy, chewy bubbles together today.
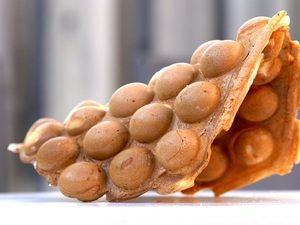
Hong Kong Bubble Waffle Recipe
Ingredients
- All-Purpose Flour (1 cup)
- Tapioca Starch (1/4 cup)
- Baking Powder (1 teaspoon)
- Granulated Sugar (1/2 cup)
- Large Eggs (2)
- Evaporated Milk (1/2 cup)
- Water (1/4 cup)
- Vegetable Oil (2 tablespoons)
- Vanilla Extract (1 teaspoon)
Tools You Need
- Bubble waffle iron
- Large mixing bowl
- Fine-mesh sieve
- Wire cooling rack
- Ladle
Steps
- Whisk flour, tapioca starch, baking powder, and sugar together in a large bowl.
- Pour in eggs, evaporated milk, water, oil, and vanilla, then stir until smooth.
- Strain the batter through a fine-mesh sieve and let it rest for thirty minutes.
- Heat your bubble waffle iron over medium heat and brush both sides with oil.
- Ladle batter into the center of the bottom mold and close the lid firmly.
- Flip the iron immediately and bake for about two minutes until golden brown.
- Transfer the warm waffle to a wire cooling rack to keep the edges crispy.