
You can skip the store-bought boxes and make a warm batch of gooey snacks right at home. Stick around, and you will get the exact trick for keeping your squares soft instead of rock hard.
Smelling melted butter and sweet marshmallows brings back memories of rainy afternoons in the kitchen. That simple scent pulls everyone straight to the counter, waiting for the pan to cool down.
Why You Will Love This Recipe
- Ready in Ten Minutes: You only need a few minutes at the stove before the whole batch is sitting in the pan. No complicated tools or baking required, making it fast for busy afternoons.
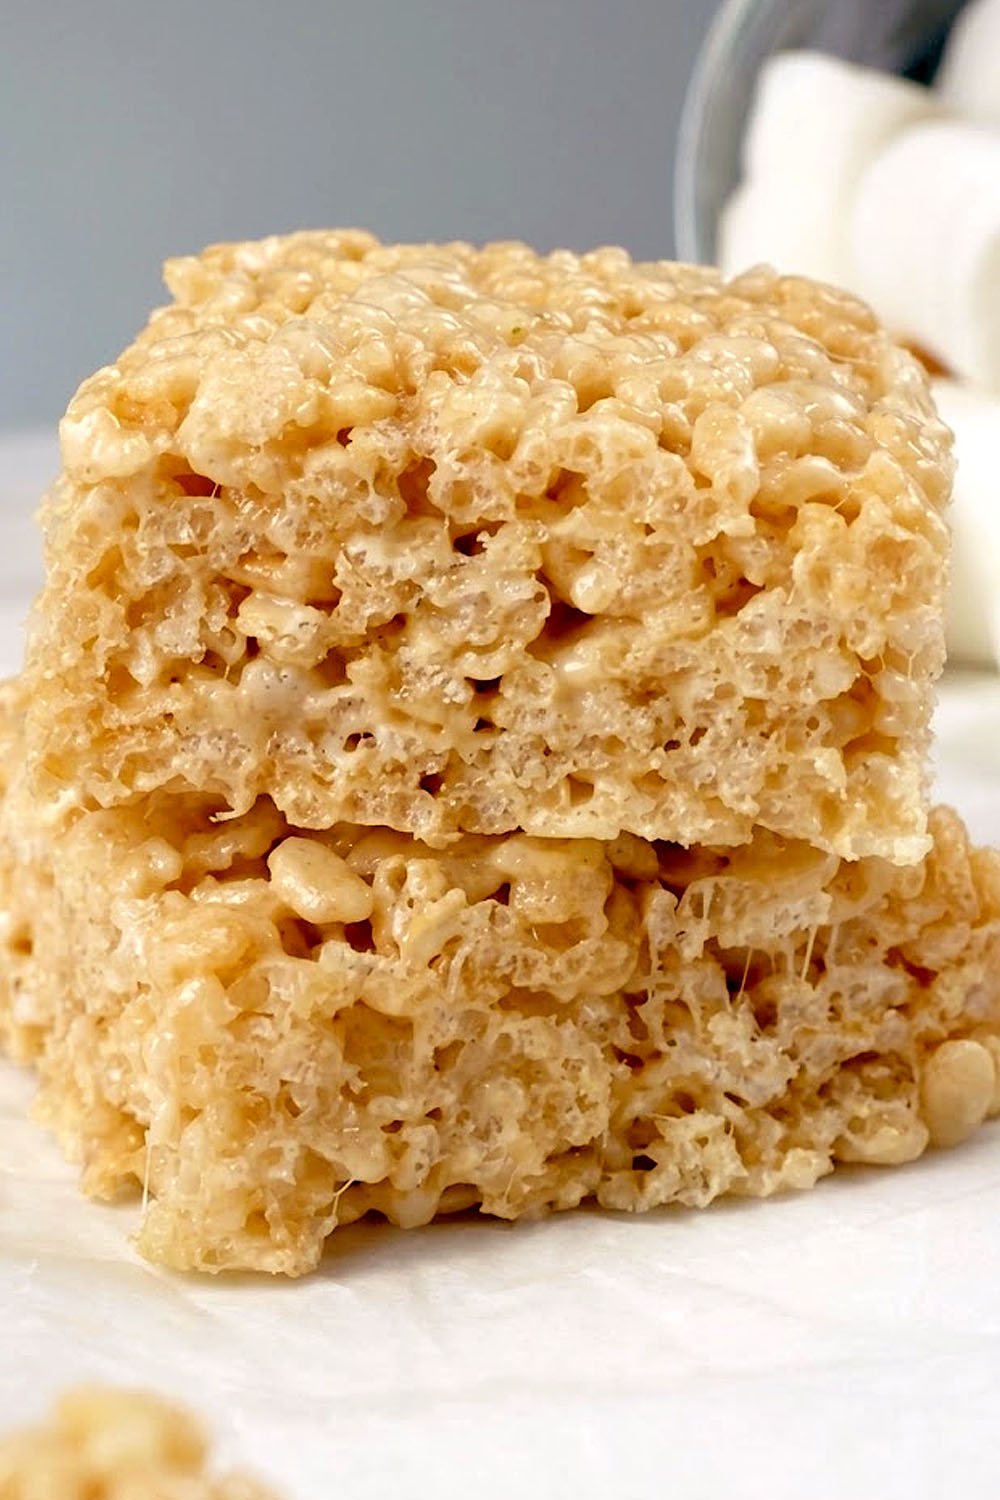
- Extra Gooey Texture: Extra marshmallows folded in at the very end stay in soft little pockets. You get that classic stretch in every single bite, instead of a dry block.
- Budget Friendly: Basic pantry items keep the cost super low for a massive tray of treats. You can feed a whole group of hungry kids without spending much money at all.
- No Oven Needed: Your kitchen stays cool because this whole recipe happens right on the stovetop. That makes it a great choice for hot summer days when turning on the oven sounds awful.
- Easy Cleanup: One pot and a rubber spatula mean you finish washing dishes in under two minutes. You get to spend your time eating instead of scrubbing stuck-on sugar.
Ingredients
- Unsalted Butter (4 tablespoons): Melts down to coat every single piece of cereal with rich flavor. Unsalted lets you control the salt level, so the sweetness never tastes harsh.
- Mini Marshmallows (10 ounces): Melt down into a sticky glue that holds the whole pan together. Saving two handfuls un-melted gives you nice little pockets of gooey texture.
- Crisped Rice Cereal (6 cups): Provides that signature loud crunch when you take a big bite. The airy pieces soak up the marshmallow sauce without getting soggy or heavy.
- Salt (1/4 teaspoon): Cuts right through the heavy sugar so the flavor tastes balanced. Just a tiny pinch makes a huge difference in keeping things from tasting too sweet.
- Vanilla Extract (1 teaspoon): Adds a warm background flavor that makes the whole batch taste homemade. Stir it into the melted butter mixture before adding your marshmallows.
Steps to Make Crisped Rice Cereal Treat Recipe (Quick and Easy Guide)
Melting the Butter Slowly
Turn your burner to low heat so the butter melts without burning. Watch the pot closely until the butter turns completely liquid and starts to foam up. Drop in your vanilla extract right away, letting the heat release that sweet bakery smell into your kitchen.
Stirring in the Marshmallows
Dump most of your mini marshmallows straight into the warm melted butter. Stir constantly with a rubber spatula until the marshmallows puff up and turn into a smooth cream. Keep the heat low, because high heat makes the sugar turn hard like brittle.
Coating the Cereal Completely
Turn off the burner completely before dumping your crisp rice cereal into the pot. Fold the cereal over gently, making sure every little piece gets coated in that sticky white sauce. Toss in the remaining whole marshmallows right now, giving them just a quick fold so they stay in chunks.
Pressing Into the Pan
Grease your baking dish with a little butter so the sticky mixture slides right out later. Dump the cereal into the pan, and press it down using a piece of wax paper. Do not push down too hard, or your squares turn into dense rocks instead of soft treats.
What Do You Serve with Crisped Rice Cereal Treat Recipe
Cold Whole Milk
A tall glass of cold milk cuts through the sticky sweetness of the cereal treats. Each sip washes down the rich marshmallow flavor, making you ready for another big bite. Kids always ask for milk with these, so keep a cold pitcher ready on the counter.
Fresh Berry Bowl
Fresh strawberries and tart raspberries add a nice juicy contrast to the heavy sweetness. The bright fruit flavors wake up your palate, keeping the snack from feeling too heavy. Toss a handful of berries right next to the square on a small plate for a colorful snack.
Hot Coffee Afternoon Break
A warm mug of black coffee balances out the sugary crunch of a mid-afternoon square. The bitter notes in the coffee match the toasted marshmallow flavor in the best possible way. You get a nice little energy boost that powers you through the rest of your workday.
Vanilla Ice Cream Scoop
Drop a warm square right on top of a cold scoop of vanilla bean ice cream. The heat from the cereal melts the edges of the ice cream into a creamy sauce. Serve this in a small bowl with a spoon when you want a richer dessert after dinner.
Storage and Reheating
Room Temperature Container
Store your cut squares in an airtight container with a piece of parchment paper between the layers. They stay soft on your counter for up to three days without turning stale or dry. Keep the lid sealed tightly, or the air makes the crisp cereal lose its crunch.
Avoiding the Refrigerator
Never put your cereal treats inside the fridge because the cold air ruins the texture completely. The chilling process makes the sugar turn hard and chewy in a very unpleasant way. Room temperature is always best for keeping that soft, marshmallow stretch alive.
Freezing for Later
Wrap individual squares tightly in plastic wrap if you want to save a batch for next month. Pop the wrapped squares into a freezer bag, and squeeze out all the extra air. Thaw them on the counter for twenty minutes before eating, and they taste just like new.
Quick Softening Trick
Stiff squares get a second chance when you pop them in the microwave for five seconds. That short burst of heat softens the marshmallow glue without melting the whole square into soup. Eat them right away while they feel warm and freshly made.
What Makes This Recipe Special
Extra Marshmallow Pockets
Most recipes melt every single marshmallow into a smooth liquid sauce. Keeping a few handfuls whole at the end creates wonderful gooey pockets throughout the pan. You get bursts of soft marshmallow in random spots, making every single bite unique.
The Right Butter Ratio
Adding a little extra butter keeps the marshmallow sauce from turning into cement. That fat coats the cereal grains gently, ensuring your teeth sink right in without a fight. You notice the difference immediately when the square stays soft instead of breaking your teeth.
Gentle Pressing Technique
Pushing the mixture down with a light touch preserves the airy crunch of the cereal. Packing the pan down too tightly squeezes out all the little air pockets that make this treat light. A loose press gives you that bakery style texture everyone loves.
Vanilla Depth
Skipping plain sugar syrup in favor of real vanilla extract adds a homemade flavor layer. That little dash of vanilla takes away the flat taste you get from cheap boxed snacks. Your kitchen smells amazing, and the taste matches that cozy feeling.
Pro Tips for the Best Results
Grease Your Hands
Rub a tiny bit of butter over your fingers before pressing the sticky mixture into the pan. The marshmallow glue sticks to metal spoons and dry hands like crazy, making a huge mess. Greased fingers let you shape the top flat without ripping the cereal apart.
Use Fresh Marshmallows
Check the date on your bag of marshmallows before starting this quick stovetop project. Old marshmallows dry out in the pantry, and they refuse to melt into a smooth, creamy sauce. Fresh bags melt instantly, giving you that stretchy glue you need for soft squares.
Remove From Heat Early
Take the pot off the burner while a few small marshmallow lumps still float in the butter. Residual heat finishes melting the rest without scorching the sugar on the bottom. Scorched sugar ruins the whole batch, giving your snacks a bitter, burnt taste.
Line the Pan
Press a sheet of parchment paper into your baking dish before adding the warm cereal mix. That simple paper sling lets you lift the whole block out onto a cutting board. Clean squares cut much easier on a flat surface than inside a deep pan.
Variations and Substitutions
Brown Butter Twist
Instead of melting standard butter, let it sizzle until it turns golden brown and nutty. That toasted flavor adds a rich, caramel note that makes these treats taste fancy. Your whole kitchen smells like a bakery the second the butter starts to brown.
Peanut Butter Swirl
Stir half a cup of creamy peanut butter into the melted marshmallow cream before adding cereal. The salty nut flavor cuts the sugar, making a rich snack that tastes like candy. Kids go crazy for this version, especially when you pack it in lunchboxes.
Chocolate Chip Addition
Drop half a cup of mini chocolate chips into the mix right before you press it down. The residual heat melts the chocolate just a little bit, creating sweet streaks throughout. Make sure the cereal cools down slightly first, or the chocolate turns into liquid.
Fruity Cereal Swap
Instead of plain crisp rice, use colorful fruity cereal for a bright breakfast twist. The citrus flavor punches through the marshmallow, giving you a fun, colorful snack plate. Your kids will love the rainbow colors every time you slice into the pan.
Frequently Asked Questions
Can You Use Old Marshmallows?
Old marshmallows lose their moisture and refuse to melt into a smooth sauce. You end up with a lumpy mess that ruins the texture of your snack. Always grab a fresh bag for the best results.
Is Salted Butter Okay to Use?
Salted butter works fine if you want to skip adding extra pinches of salt. Just watch how much you add, so the final treat does not taste too salty. Unsalted butter gives you total control over the exact flavor balance.
Are These Treats Gluten Free?
Most crisp rice cereal brands are naturally gluten free, but always check the box label. Marshmallows and butter contain no gluten, making this a safe snack for most diets. Read the fine print on your cereal box just to be completely sure.
Do Marshmallows Expire in the Pantry?
Marshmallows do go stale over time, turning hard and losing their soft, fluffy texture. Stale marshmallows will not melt correctly, leaving your treats dry and tough to chew. Check the date on the bag before you start cooking.
Does the Pan Size Matter?
A standard nine by thirteen inch pan gives you nice, thick squares that hold together well. Using a smaller pan makes them way too thick, while a bigger pan makes them flat. Stick to the standard size for the best texture in every bite.
Can You Add Extra Vanilla?
Adding a little extra vanilla extract makes the flavor richer and more homemade. Just do not add too much liquid, or the marshmallow sauce gets too runny. One teaspoon is plenty for a standard batch of cereal treats.
Are These Easy for Kids?
Older kids can help measure and stir the cereal once the butter cools down a bit. Little ones should stay away from the warm stove while the marshmallows are melting. Shaping the treats in the pan is a fun job for little hands.
Does Coconut Oil Work Instead?
Coconut oil can replace butter if you need a dairy free option for your family. It melts down just like butter, but it adds a faint tropical coconut flavor. Pick refined coconut oil if you want to avoid that specific taste in your snack.
Final Thoughts
Making these treats takes almost no time, and the gooey result always beats store-bought boxes. Grab your pot today, and enjoy a warm square straight from the pan.
Quick Crisped Rice Cereal Treat Recipe Kids Love
Ingredients
- Unsalted Butter (4 tablespoons)
- Mini Marshmallows (10 ounces)
- Crisped Rice Cereal (6 cups)
- Salt (1/4 teaspoon)
- Vanilla Extract (1 teaspoon)
Tools You Need
- Large pot
- Rubber spatula
- 9×13 inch baking dish
- Parchment paper
Steps
- Melt the butter in a large pot over low heat until completely liquid.
- Stir in the vanilla extract and most of the mini marshmallows until smooth.
- Turn off the heat and fold in the crisped rice cereal and remaining marshmallows.
- Press the mixture gently into a greased baking dish lined with parchment paper.
- Let the treats cool completely before slicing them into squares.