
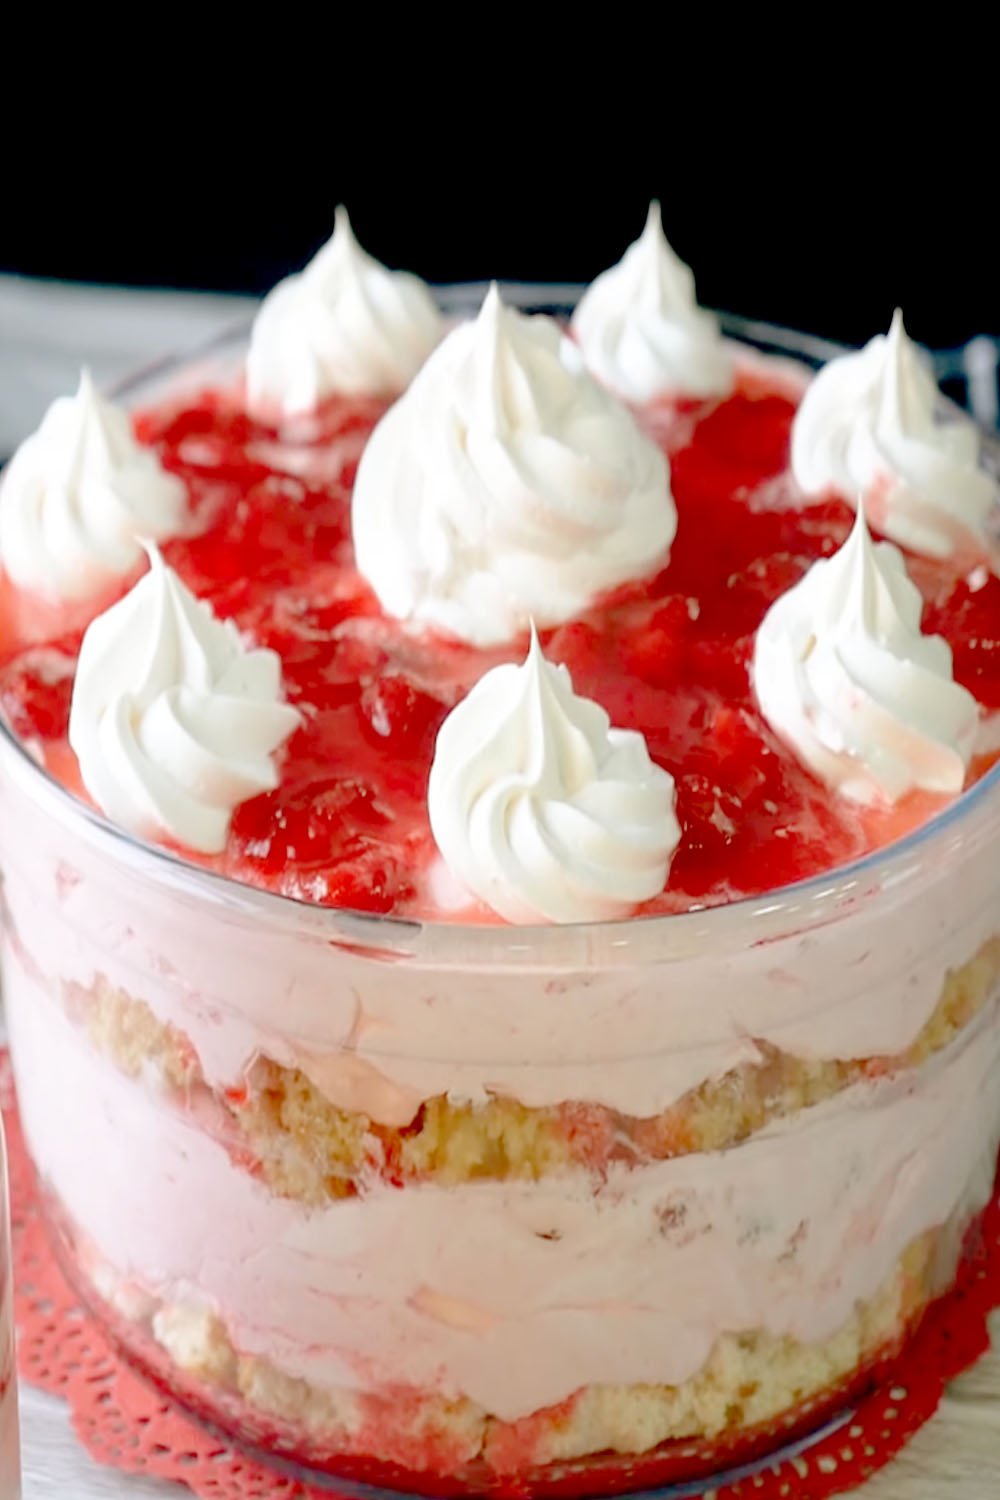
Do you want a light, sweet treat that everyone loves? This fruit salad with angel food cake is truly refreshing.
I remember the first time I threw this together for a backyard party. Everyone kept asking for the secret ingredient, even though it is so simple to make. This dish brings together fluffy cake, creamy dressing, and juicy berries. It is the perfect way to satisfy a sweet tooth without feeling weighed down. You are going to absolutely love every bite.
First, you need to cut your cake into small, bite sized pieces so they soak up the flavors properly. Always wash and dry your fruit thoroughly to keep the salad from getting soggy or watery. Whisk your creamy dressing until it is completely smooth before folding it into the other ingredients. Finally, let the dish chill in the fridge for at least an hour. This helps the cake cubes get that perfect, melt in your mouth texture.
Picking the Best Ingredients for Your Fruit Salad
Choose a Fresh and Fluffy Cake
You can definitely bake your own cake if you have the time. However, a store bought one works just as well for this recipe. Look for a cake that feels light and springy when you gently press the container. If the cake is too dry, it might crumble when you start tossing it with the fruit. A fresh loaf ensures you get those perfect little clouds of sweetness in every single spoonful.
Pick the Brightest Seasonal Berries
Strawberries and blueberries are the classic choices for this specific dessert. Try to find berries that are firm and have a deep, rich color. Avoid any containers that have bruised fruit at the bottom. Since the berries are the star of the show, their natural sweetness really makes the dish pop. You can also add raspberries or blackberries if you want a bit more tang in the mix.
Select a High Quality Creamy Base
The dressing usually involves a mix of whipped topping and some kind of yogurt or pudding. I personally love using a vanilla Greek yogurt because it adds a nice little zip. Make sure your whipped topping is fully thawed before you try to mix it. If it is still icy, the texture of the salad will be grainy. A smooth base is what ties the cake and fruit together perfectly.
Find the Sweetest Natural Additions
Sometimes the fruit isn’t quite sweet enough on its own. You might want to have a little bit of honey or maple syrup on hand just in case. A splash of vanilla extract can also elevate the flavor profile of the whole bowl. These small additions turn a basic fruit mix into something that tastes like it came from a fancy bakery. Just a tiny bit goes a long way here.
How to Prepare Your Fruit for the Bowl
Wash the Berries Very Carefully
You should always rinse your fruit under cool running water. I like to use a colander so the water drains away immediately. Be gentle with the raspberries since they can fall apart quite easily. Once they are clean, lay them out on a paper towel to dry. Removing the excess moisture is a vital step because it prevents the cake from getting mushy later on.
Slice the Strawberries into Even Pieces
Take off the green tops and slice your strawberries into thin rounds or quarters. I prefer quarters because they match the size of the cake cubes better. Try to keep the pieces around the same size so you get a bit of everything in one bite. If the strawberries are huge, you might even want to dice them. Consistency makes the final presentation look much more professional and inviting.
Check Your Blueberries for Stems
It is common to find tiny little stems still attached to the blueberries. Take a quick minute to pick those off while you are washing them. Nobody wants to bite into a woody stem while they are enjoying a soft dessert. This extra bit of attention shows your guests that you really care about the details. It makes the eating experience much smoother and more enjoyable for everyone.
Keep the Fruit Chilled Until Mixing
Once your fruit is sliced and ready, pop it back into the fridge. Cold fruit stays firm and tastes much more refreshing on a hot afternoon. If you leave it on the counter, it might start to release too much juice. We want that juice to stay inside the fruit until you actually eat it. Keeping things chilly is the best way to maintain that crisp texture we all love.
✅ Also Read: How to Sweeten Greek Yogurt without Sugar (Easy Way)
Cutting the Cake for the Perfect Texture
Use a Serrated Knife for Clean Cuts
Angel food cake is very delicate and can squash easily if you use a dull blade. A bread knife with a serrated edge is the best tool for this job. Use a gentle sawing motion rather than pressing down hard. This technique keeps the air bubbles inside the cake intact. You want those little pockets of air to stay open so they can trap the creamy dressing later.
Aim for One Inch Cubes
Size really does matter when it is time to assemble this salad. I find that one inch cubes are the sweet spot for most people. They are big enough to hold their shape but small enough to fit on a spoon. If the cubes are too big, the dessert becomes hard to eat. If they are too small, they might disappear into the dressing and lose their identity.
Remove any Dark Brown Edges
Some store bought cakes have a very dark or thick outer crust. I usually like to trim the darkest bits off to keep the salad looking bright and white. This is totally optional, but it does make the texture much more uniform. The soft white interior of the cake is what really absorbs the flavors. Plus, it just looks a lot prettier in a glass serving bowl.
Let the Cubes Air Dry Slightly
If your cake is extremely moist, let the cut cubes sit on a baking sheet for ten minutes. This very brief drying period helps them hold up against the wet fruit and cream. It creates a slightly sturdier exterior that won’t fall apart the moment you start stirring. Think of it like prepping bread for a really good French toast. It is a pro tip that makes a huge difference.
Whisking Together the Secret Creamy Dressing
Start with a Softened Cream Base
If you are using cream cheese or a thick yogurt, let it sit at room temperature for a bit. This makes it much easier to whisk into a silky consistency. Cold cream cheese often stays lumpy, which is not what we want here. You want a liquid that flows easily but still has enough body to coat the spoon. Take your time with this step to ensure total smoothness.
Add a Hint of Citrus Zest
One of my favorite tricks is adding a little bit of lemon or lime zest to the cream. The bright acidity cuts through the sugar and makes the fruit flavors shine. Just grate a tiny bit of the peel directly into the bowl. Be careful not to get the white pith because that part is quite bitter. This tiny addition adds a wonderful aroma that hits you as soon as you serve it.
Fold in the Whipped Topping Gently
Once your base is flavored and smooth, it is time to add the fluffy whipped topping. Do not use a whisk for this part or you will deflate all the air. Instead, use a rubber spatula to gently fold the mixture together. Use a circular motion from the bottom to the top until the color is even. This keeps the dressing light and airy like a sweet cloud.
Taste for Sweetness Before Mixing
Every batch of fruit has a different level of natural sugar. Dip a clean spoon in and see if the dressing needs a little boost. If it tastes a bit flat, add a teaspoon of powdered sugar or honey. Remember that the cake is already sweet, so do not go overboard. You want a balanced flavor that complements the tart berries rather than hiding them.
Assembling the Salad without Mashing the Ingredients
Use a Very Large Mixing Bowl
You need plenty of room to move the ingredients around without squishing them. Pick a bowl that is much larger than the total volume of your ingredients. This allows you to toss everything loosely. If the bowl is too small, you will end up pressing the cake into a paste. Space is your best friend when you want to keep things looking fresh and beautiful.
Layer the Ingredients Before Stirring
I like to put half the cake in first, followed by half the fruit and half the dressing. Repeat the layers one more time before you even touch a spoon. This method distributes the components more evenly from the start. It means you will need fewer stirs to get everything coated. The less you handle the salad, the better the final texture will be for your guests.
Use a Wide Spatula for Tossing
Forget about using a heavy metal spoon for this task. A wide silicone spatula is much softer on the delicate cake cubes. Slide the spatula down the side of the bowl and lift from the bottom. Turn the bowl slightly after each fold to ensure you reach every corner. Stop the moment everything looks coated to avoid overworking the mixture.
Check for Even Distribution of Fruit
Look through the bowl to make sure the berries aren’t all huddled at the bottom. You want every serving to have a good mix of cake and colorful fruit. If you see a big clump of cake, gently nudged a few berries into that spot. A well balanced bowl looks much more appetizing on the table. It ensures that nobody feels left out of the berry goodness.
Chilling and Serving for the Best Results
Give it Time to Set in the Fridge
Patience is the most important ingredient in this entire recipe. You really need to let the salad sit in the refrigerator for at least sixty minutes. This allows the cake to pull in some of the moisture from the dressing. It transforms the texture into something truly magical and cohesive. If you serve it immediately, the cake might feel a bit too dry and separate.
Cover the Bowl with Plastic Wrap
Make sure you seal the bowl tightly before putting it in the fridge. This prevents the cake from picking up any stray odors from other foods. It also keeps the top layer of fruit from drying out or turning brown. A tight seal maintains the perfect environment for the flavors to meld together. Your salad will stay fresh and vibrant until the moment you are ready.
Garnish with Fresh Mint Leaves
Right before you bring the dish to the table, add a few sprigs of fresh mint. The green color looks stunning against the red and blue berries. It also adds a very subtle cooling sensation that is wonderful in the summer. If you want to go extra fancy, you can sprinkle a few extra fresh berries on top. This hides any spots where the dressing might have settled.
Serve in Clear Individual Glass Bowls
Presentation is half the fun when you are serving a beautiful fruit dessert. Using clear glass bowls allows everyone to see the colorful layers and textures. It makes the dish feel like a special treat rather than just a side salad. You can even layer it like a trifle if you want a more structured look. Small details like this make your hard work really shine.
Storing Your Leftovers Safely and Effectively
Keep it Cold at All Times
If you have leftovers, get them back into the fridge as soon as possible. Dairy based dressings can spoil if they sit out in the sun for too long. I usually only bring the bowl out right when it is time to eat. If you are at a picnic, keep the serving bowl inside a larger bowl filled with ice. This keeps everything food safe and deliciously cold.
Eat the Leftovers Within Two Days
This salad is definitely best on the day you make it. However, it will still taste great for about forty eight hours if stored properly. After the second day, the cake might start to get a little too soft. The fruit will also begin to release more of its natural juices. It is still safe to eat, but the texture won’t be quite as perfect.
Avoid Freezing this Specific Salad
You might be tempted to freeze the extras, but I really don’t recommend it. The cake and the creamy dressing do not hold up well to the freezing process. When it thaws, the cake will become soggy and the dressing might separate. This is a dish that is meant to be enjoyed fresh. If you have too much, just share some with a lucky neighbor or friend.
Refresh with a Little Extra Topping
If the leftovers look a bit flat the next day, you can easily wake them up. Add a dollop of fresh whipped cream and give it a very gentle stir. This adds a bit of new life and moisture back into the mix. You can also throw in a handful of fresh berries to brighten the colors. It makes the second day portions feel brand new again.
Final Thoughts
I really hope you enjoy making this fruit salad with angel food cake for your next gathering. It is such a simple way to bring a smile to everyone’s face without spending hours in the kitchen. Remember to keep your movements gentle and your ingredients fresh for the best results. This light and airy treat is sure to become a staple in your home. Happy eating and enjoy the sweetness!
Refreshing Fruit Salad with Angel Food Cake
Ingredients
- 1 whole angel food cake (store-bought or homemade)
- 2 cups fresh strawberries, hulled and quartered
- 1 cup fresh blueberries, stems removed
- 1 cup fresh raspberries
- 1 container (8 oz) whipped topping, fully thawed
- 1 cup vanilla Greek yogurt or vanilla pudding
- 1 teaspoon lemon zest (optional)
- Fresh mint leaves for garnish
Tools You Need
- Serrated bread knife
- Large mixing bowl
- Colander for rinsing fruit
- Paper towels
- Rubber spatula
- Microplane or grater for zest
- Plastic wrap
Steps
- Rinse all your berries under cool water using a colander. Pat them very dry with paper towels to prevent the salad from becoming watery.
- Use a serrated knife to cut the angel food cake into even one-inch cubes. If the cake is very moist, let the cubes sit out for ten minutes to firm up.
- In a medium bowl, whisk together the vanilla yogurt and lemon zest until smooth. Gently fold in the thawed whipped topping with a spatula until light and fluffy.
- Place half of the cake cubes in your largest mixing bowl. Top with half of the prepared fruit and half of the creamy dressing.
- Repeat the layers with the remaining ingredients. This layering technique helps you mix everything more easily without crushing the delicate cake.
- Using a wide spatula, gently fold the mixture from the bottom to the top. Stop as soon as the cake and fruit are lightly coated in the cream.
- Cover the bowl tightly with plastic wrap. Place it in the refrigerator for at least sixty minutes to allow the flavors to meld and the cake to soften.
- Just before serving, garnish with fresh mint leaves and a few extra berries. Serve in clear glass bowls for the best presentation.
Frequently Asked Questions (FAQs)
Is it possible to use frozen fruit for this recipe?
You can use frozen fruit if you are in a real pinch, but I do not recommend it. Frozen berries release a lot of liquid as they thaw, which makes the cake very soggy. If you must use them, drain them completely and pat them dry with a towel first. Fresh fruit provides a much better texture and a brighter flavor for this specific dessert.
Can I make this dessert a day in advance?
It is actually better to make this a few hours before serving rather than a whole day ahead. If it sits overnight, the cake might become too soft and lose its structure. The best window for serving is between two and four hours after you mix everything together. This gives the flavors enough time to blend without ruining the fluffy texture of the cake.
Do I have to use a specific brand of cake?
No, you do not need a specific brand at all. Any store bought or homemade angel food cake will work perfectly fine. Just make sure the cake is fresh and does not have a stale smell. Some people prefer the ones from the bakery section because they are often softer than the boxed versions. Use whatever is easiest for you to find at your local store.
Is it okay to use a different type of cake?
You could technically use pound cake or sponge cake, but the result will be much heavier. Angel food cake is unique because it is so light and airy, which is perfect for a fruit salad. Other cakes might become dense and gummy when they touch the dressing. If you want that classic cloud-like feel, stick with the traditional angel food cake for this recipe.
Can I use a sugar free dressing for this?
Yes, you can definitely swap the ingredients for sugar free versions if you prefer. Use a sugar free whipped topping and a plain or stevia sweetened yogurt. Since the fruit and cake are already sweet, most people won’t even notice the difference. This is a great way to make the dessert a little bit lighter while still keeping all the delicious flavors intact.
Do I need to peel the fruit before adding it?
For berries like strawberries and blueberries, there is no need to peel anything. If you decide to add other fruits like peaches or apples, you should probably remove the skins. Peach skins can be a bit fuzzy and tough in a soft salad like this. Always aim for textures that are easy to chew and swallow so the dessert feels very refined and smooth.
Can I add nuts to the salad for extra crunch?
Adding nuts is a great idea if you want a bit of a texture contrast. Toasted pecans or sliced almonds work wonderfully with the berries and cream. I suggest adding the nuts right before you serve the dish so they stay crunchy. If they sit in the dressing for too long, they will eventually get soft. A little bit of crunch makes each bite interesting.
Is it hard to double the recipe for a large party?
This recipe is incredibly easy to double or even triple for a big crowd. Just make sure you have a massive bowl to do the mixing so you don’t crush the cake. You can also prepare the fruit and cake ahead of time and keep them in separate bags. Mix them together with the dressing a few hours before the party starts for the best results.